B.W.T...Link
by the students, for the students
0

How To Fix Binding

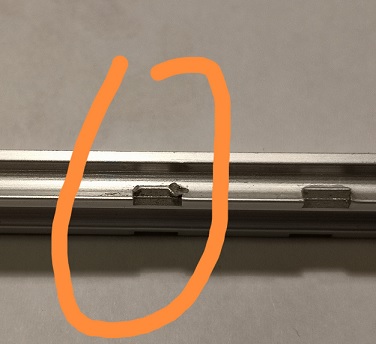
One of the normal causes of binding is from repeated extension and retraction of slides at a high speed. This operation over time wears down the end stop (see image below), making it difficult for the ball bearings to roll smoothly as intended. Fortunately, BWTLink's slide is the one and ONLY one that can be easily modified to avoid binding caused from high speed usage. Our new versions, BL-300A-2M, BL-300B-2M, BL-300C-2M, BL-350C.-2M, BL-400A-2M, and BL-400B-2M have resolved this binding issue!

This article provides a detailed guide for teams who purchased our first version (BL-300-2M) of slides to fix binding on your own.


 Instructions:

  • Disassembly of BWTLink Slides
    1. Lay the slide on a clean surface to avoid ball bearing from rolling out and being lost.
    2. Unscrew the 4 nuts (labeled 1 ~ 4 in above image) and remove the 4 respective T-type screws (and pulley modules if mounted).
    3. Pull out the inner slide to the end with the removed T-screws/nuts slowly and completly. Make sure all ball bearings (total 30 bearings with 15 on each side) are present.

  • Replace Inner Ball Bearing Stopper
    BL-300-2M has a total of 4 punched end stoppers (IS1 ~ IS4). That said, the only ones affected by high velocity smashing force are IS3 and IS4. Here are 3 possible solutions to replacing these two end stops to fix all binding issues:

    • Solution 1 - Pins
      1. Use 1/16" drill bit to drill 2 holes (2.3mm/0.09" depth) near to the edge of IS3 and IS4. The hole's edge should not exceed the edge of stoper.
      2. Cut a 1/16" steel (don NOT use soft metal) wire pin at 4mm long.
      3. Compress and embed this pin into the holes drilled in step 1 with a bit of screw glue.


    • Solution 2 - Staple
      1. Use 1/16" drill bit to drill 2 holes (2.3mm/0.09" depth) near to the edge of IS3 and IS4.
      2. Cut a 1/16" steel (don NOT use soft metal) wire 12mm long.
      3. Bend this cut wire to the shape of a staple to fit into holes.
      4. Make sure the corner of the staple is flat rather than rounded to avoid additionally binding.
      5. Compress and embed this staple into the holes drilled in step 1 with a bit of screw glue.


    • Solution 3 (Recommended) - Screw
      The solutions described above may not be ideal if the pin/staple are not completely fastened within the drilled holes. As a result, this solution with screws is the best and most effective one.
      1. Use 1/16" drill bit to drill 2 through holes near to the edge of IS3 and IS4.
      2. Use M2 tap to make M2 thread holes.
      3. File screw head of M2 screws (5mm long button type or flat head) down to a cylindrical shape to avoid ball bearing damage.
      4. Screw the reshaped screw into the M2 hole drilled in step 1 with a bit of screw glue.


  • Reassembly of BWTLink Slide
    1. Use a clean cloth or paper towel to clean outer slide, inner slide, and all ball bearings.
    2. Mix 80% solid grease and 20% liquid lubricant. This will provide better performance.
    3. Apply this mixture on the channel groove surface of the outer slide evenly.
    4. Place 3 ball bearings to OS5-OS7 and OS6-OS8 indicated in the image above.
    5. Place 9 ball bearings in the bottom side of the outer slide.
    6. Put the inner slide into outer slide and against those 9 ball bearings.
    7. Slide the inner slide out a little bit so that the IS3 stopper is out of the outer slide.
    8. Push in 9 ball bearings one by one into top row of outer slide.
    9. Push the inner slide to the left until the IS3 stopper is completely into outer slide.
    10. Load 3 ball bearings (2 ball bearings works as well if there isn't enough space to hold 3) one by one for IS3 and IS4 range.
    11. Slowly push the inner slide to the left and make sure the 2nd set of 3 ball bearing inside of OS5 ~ OS8 are fully secure.
    12. Move the inner slide to the left further so that the T-type screws can be remounted on the right side of the slide.
    13. Secure the nuts.

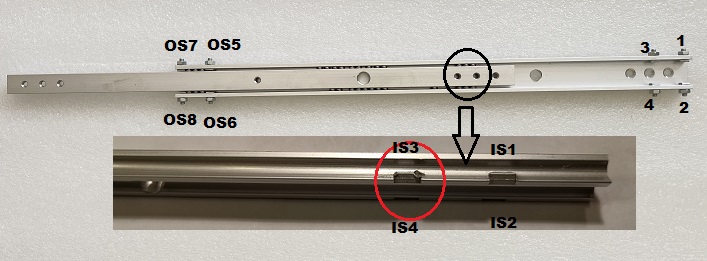
BWTLink Series Drawer Slide Disassembly/Reassembly Tutorial


© 2024 - BWTLink LLC